Sometimes you might have encountered the UEFI Secure Boot feature while tried to install a second operating system alongside Windows. Secure Boot is handy for preventing malicious code from running on your system. But it also stops you from booting some legitimate operating systems, like Kali Linux, Android x86, or TAILS. Here this post we have a short guide on how to disable UEFI Secure Boot to let you dual boot any operating system you like.
Before this let’s first understand the UEFI secure boot. The Secure Boot is a feature of the Unified Extensible Firmware Interface (UEFI) act something of a security gate analyzes code before you execute it on your system. And if the code has a valid digital signature, Secure Boot lets it through the gate. If the code has an unrecognized digital signature, Secure Boot blocks it from running, and the system will require a restart.
Well if you know the code is safe and comes from a reliable source, might not have a digital signature in the Secure Boot database that causing the block. Well in such a situation you can disable UEFI secure boot following the steps below.
Disable Secure Boot on Windows 10
Please note that turning Secure Boot back on may require a BIOS reset. This does not cause your system to lose any data. It does, however, remove any custom BIOS settings. Moreover, there are some examples where users are permanently no longer able to turn on Secure Boot, so please bear that in mind.
- Hold the old Shift key on the keyboard and selecting Restart to enter the Advanced Boot Menu.
- Also you can Go to Settings > Update & Security > Advanced Startup options.
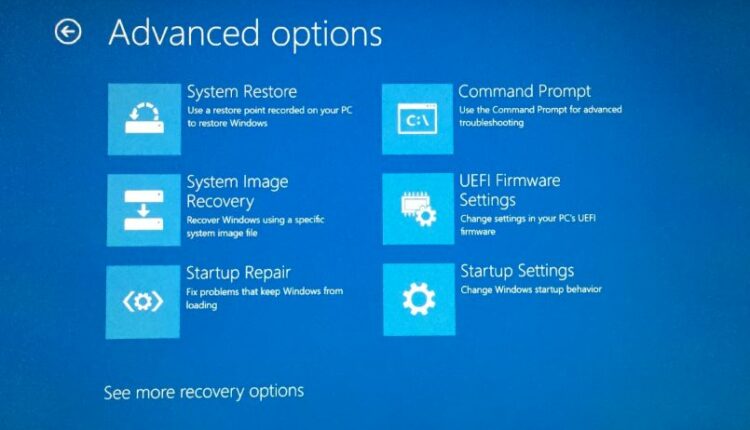
- Then you click on Restart Now, which will reboot your PC, and offer you all these advanced options.
- Then select Troubleshoot > Advanced Options: UEFI Firmware Settings.
- Find the Secure Boot option, If possible, set it to Disabled.
- It is usually found in the Security tab, Boot tab, or Authentication tab.
- Save and Exit, Your system will reboot.
- You have successfully disabled Secure Boot.

How to Enable Secure Boot Windows 10
Of course, you might want to turn Secure Boot back on. After all, it does help protect against malware and other unauthorized code. If you directly install an unsigned operating system, you’ll need to remove all traces before attempting to turn Secure Boot back on. Otherwise, the process will fail.
- Uninstall any unsigned operating systems or hardware installed when Secure Boot was disabled.
- Turn your computer off. Then, turn it back on and press the BIOS entry key during the boot process, as above.
- Find the Secure Boot option and set it to Enabled.
- If Secure Boot doesn’t enable, try to Reset your BIOS to factory settings.
- Once you restore factory settings, attempt to enable Secure Boot again.
- Save and Exit. Your system will reboot.
- In the event, the system fails to boot, disable Secure Boot again.
What to do if secure boot failed to enable?
Make sure to turn UEFI settings on in the BIOS menu; this also means making sure Legacy Boot Mode and equivalents are off.
Also, Check your drive partition type
UEFI requires a GPT partition style, rather than the MBR used by Legacy BIOS setups. To do this,
- Press Windows + R, keyboard short, type compmgmt.msc, and ok
- This will open Computer Management
- Select Disk Management from the menu.
- Now, find your primary drive, right-click, and select Properties.
- Now, select the Volume. Your partition style is listed here.
Note: If you need to switch from MBR to GPT there is only one option to change the partition style: back up your data and wipe the drive. And follow the steps here Convert MBR to GPT using Diskpart.